This menu option allows you to reconfigure the Floorplan that was created during the first-time setup wizard. New Floors and rooms can be created, and existing Floors and rooms can be renamed, moved and even deleted.

The Info Panel
In order to make any changes to the Floorplan, go to | .
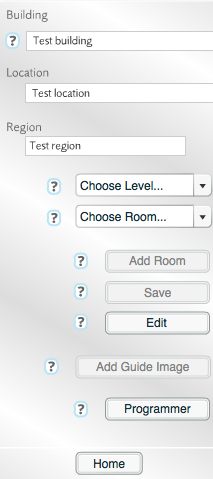
The property's building name, location and region can all be edited directly in the Info Panel, which can be found on the left-hand side of the screen.
The Info Panel allows you to choose the floor on which you would like to work, via the Choose Level dropdown menu.
Choosing a floor will show a representation of that floor's rooms in the main grid.
Creating A Room
All new rooms 'float' on top of the other rooms on the Floor. Create the largest room on the Floor first. Create the smallest room on the Floor last.
To create a new room, do the following:
- Choose the Floor on which the new room will be defined, using the Choose Level dropdown menu.
- Click .
- Select a room name from the Choose Room dropdown menu.
- Click .
A new room will appear in the main grid, and can now be renamed, moved, resized or deleted.
Renaming, Moving, Resizing And Deleting A Room
To rename, move, resize or delete a room, do the following:
- Choose the Floor on which the target room has been defined, using the Choose Level dropdown menu.
- Click .
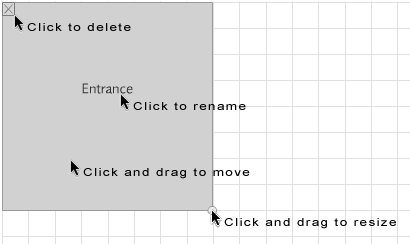
Each room on the Floor will now display a circular drag handle and an 'x' in the top-left corner.
- Rename the room by clicking the room's label and entering the new name.
- Move the room by clicking and dragging the blank, grey area of the room.
- Resize the room by clicking and dragging the circle in the bottom-right corner of the room.
- Delete the room by clicking the 'x' in the top-left corner. Note that rooms can be deleted only if they contain no Objects, Zones or devices/outputs.

Rename, move, resize or delete
Editing A Floor Name
To edit the name of a Floor:
- Choose the Floor from the Choose Level dropdown menu.
- Click .
- Edit the name of the Floor (beneath the main Floorplan grid).
- Click next to the new Floor name.
- Click in the Info Panel.

Rename floor